How to Choose the Right Illuminated Tact Switch
FLUID HANDLING EXPERTS

Blog, all our news

How to Choose the Right Illuminated Tact Switch

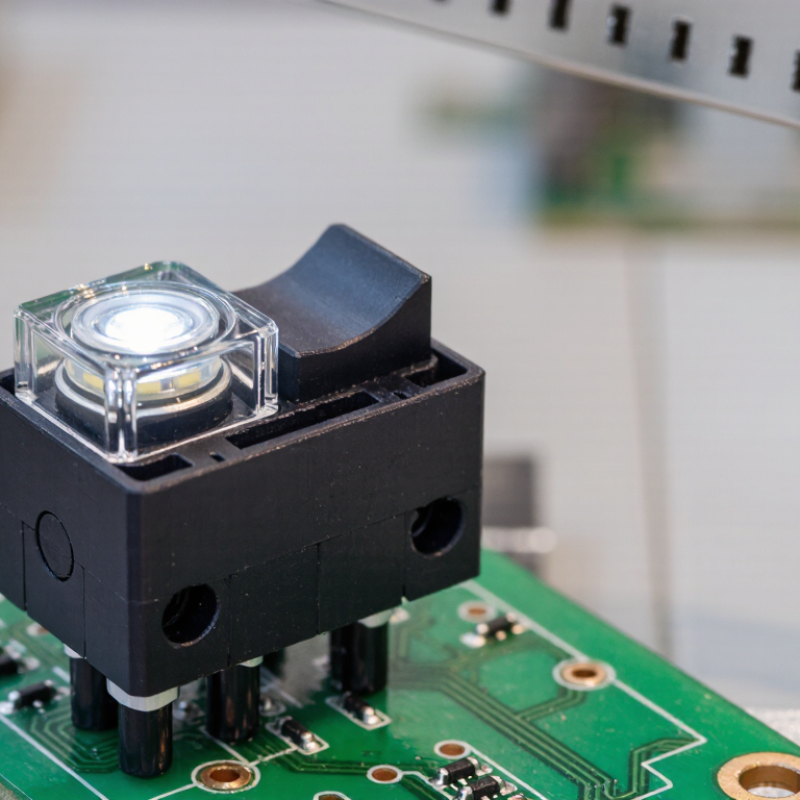
Choosing the right Illuminated Tact Switch means balancing feel, visibility, electrical requirements, and available space. A switch may look suitable in a catalog but feel too stiff on a small control panel. The details matter.

Start with the way the device will be used. Check the required operating force, actuator height, mounting footprint, and expected number of presses. Then confirm the LED’s supply voltage, current, color, and polarity against the product datasheet. These details help prevent mismatches during assembly. A clear datasheet is useful, but it cannot tell you exactly how a switch will feel in your finished product.

Lighting also needs practical attention. A bright indicator can disappear in direct sunlight, while excessive brightness may distract users in a dim room. Consider the lens color, viewing angle, panel material, and surrounding light. Small details matter. If the switch sits behind a tinted overlay, test the assembled panel rather than relying on the LED specification alone.

This guide explains how to compare key specifications, narrow suitable options, and check a switch before committing to a design. Where possible, order samples and test them in the actual enclosure. A quick bench test can reveal uneven illumination, awkward actuation, or a fit issue that drawings miss. There is no perfect switch for every application. The best choice is the one that meets documented requirements and works reliably in its intended setting.
How to Choose the Right Illuminated Tact Switch

Define Circuit and Installation Requirements Before Comparing Switch Datasheets

How to Choose the Right Illuminated Tact Switch
Define Circuit and Installation Requirements Before Comparing Switch Datasheets

Before comparing datasheets, map the switch’s job in your circuit. Is the contact normally open or normally closed? Will it carry a low-current logic signal or switch a load directly? Check the required voltage and current, including startup conditions. A switch that fits the circuit on paper may still wear quickly under frequent use.

Treat the illumination circuit separately from the switching contacts. Confirm the LED’s forward voltage, operating current, and polarity, then determine whether your circuit needs a current-limiting resistor. Also note whether the LED and switch have separate terminals. For installation, measure the board footprint, switch height, actuator travel, and available panel clearance. A few millimeters matter when a button sits behind a thick faceplate. It’s easy to overlook that.

Tips: Write down your electrical limits and physical measurements before opening a datasheet. Compare contact ratings at your actual DC voltage, not just a headline maximum. Check the pin layout against your PCB drawing, and verify that the illuminated cap is visible in the room’s lighting. One detail may still need testing: indicator brightness can look different behind a tinted panel.

Match the PCB Footprint: 6 × 6 mm Is a Common Tact-Switch Format

How to Choose the Right Illuminated Tact Switch

A 6 × 6 mm tact switch is a common format, but that measurement usually describes the switch body—not its complete PCB footprint. Lead spacing, pin arrangement, and mounting tabs can differ between parts. The 6 × 6 label sounds precise, but it does not tell the whole story. Check the manufacturer’s dimensional drawing and recommended land pattern before placing pads. A few tenths of a millimeter can affect soldering and alignment.

For an illuminated switch, inspect the LED terminals separately from the switch contacts. Confirm their polarity, pad locations, and required board clearance. Also check actuator height against the enclosure; a switch can fit the footprint and still sit too low beneath the panel. Keep nearby components clear of the button’s travel. It is easy to overlook this when the board is viewed only on screen.

Tips: Print the PCB layout at 1:1 scale and place the component outline over it. Check pad pitch, body edges, and button access. If the drawing leaves a detail unclear, pause and verify it rather than guessing. A small prototype can reveal fit issues early.

Compare Actuation Force (Often 100–500 gf) and Travel in Datasheets

How to Choose the Right Illuminated Tact Switch

Compare actuation force and travel in the datasheet, not just the switch’s appearance. Many tact switches fall between 100 and 500 gf, roughly 0.98 to 4.9 N. A lower force can suit frequent, light presses; a higher force may help prevent accidental activation. But the number alone can mislead. Check whether it describes typical or maximum force, and look for stated tolerances.

Travel affects how a press feels and how clearly users sense activation. Compare pre-travel, operating position, and total travel when the datasheet provides them. A short-travel switch can feel quick, while more movement may provide clearer feedback beneath a fingertip. For a handheld control, test presses with the actual panel and overlay; these can change the feel. I have found that paper comparisons do not always predict the finished assembly.

Tips: Check force and travel together. Test a few samples under your intended mounting conditions, and note any fatigue or accidental presses. Small differences matter. Datasheet values are useful, but real fingers are inconsistent.

Size the LED Drive Using Forward Voltage (Typically 1.8–3.3 V) and Current

An illuminated tact switch needs a current-limited LED drive, not just a voltage match. Typical indicator LEDs have forward voltages around 1.8–2.2 V for red and 2.8–3.3 V for blue or white. These are common datasheet ranges, not guarantees. Check the switch supplier’s LED specification, especially the test current and maximum rating. Small differences matter.

For a 5 V supply, a 2.0 V red LED, and a 5 mA target, use R = (5 − 2) / 0.005 = 600 ohms; a nearby standard value is 620 ohms. At 3.1 V, the same supply and current call for about 380 ohms, so 390 ohms is a practical choice. Keep a resistor in each branch if LEDs are wired in parallel. Don’t design around the maximum current rating. It can make a tiny switch warm and shorten LED life. A little margin helps.

CIE 127:2007, Measurement of LEDs, stresses controlled conditions for comparing LED output. Forward voltage shifts with current and temperature, so verify the circuit under actual operating conditions. Measure the voltage across the LED and resistor after the switch has been held on. That quick check is easy to skip. I would still repeat it with the final enclosure, where heat can build up.

How to Choose the Right Illuminated Tact Switch — Size the LED Drive Using Forward Voltage (Typically 1.8–3.3 V) and Current

LED color Typical forward-voltage range Design Vf used for resistor sizing Example supply voltage Target LED current Calculated minimum resistor Suggested E12 resistor Approx. current at minimum Vf
Red 1.8–2.2 V 1.8 V 5.0 V DC 5 mA 640 Ω 680 Ω 4.7 mA
Amber 2.0–2.4 V 2.0 V 5.0 V DC 5 mA 600 Ω 680 Ω 4.4 mA
Green 2.0–3.2 V 2.0 V 5.0 V DC 5 mA 600 Ω 680 Ω 4.4 mA
Blue 2.8–3.3 V 2.8 V 5.0 V DC 5 mA 440 Ω 470 Ω 4.7 mA
White 2.8–3.3 V 2.8 V 5.0 V DC 5 mA 440 Ω 470 Ω 4.7 mA

Calculation: Series resistor R = (Vsupply − Vf) ÷ I. For a conservative current limit across the stated Vf range, this example uses the minimum Vf.

Example: For a red LED at 5.0 V and a 5 mA target, R = (5.0 − 1.8) ÷ 0.005 = 640 Ω; the next higher E12 value is 680 Ω.

Important: Forward-voltage ranges are indicative, not guaranteed. Check the specific illuminated switch’s datasheet for LED Vf, maximum continuous current, polarity, and resistor requirements. The 5 mA target is illustrative; do not exceed the LED rating. At 5 V, a 0.125 W or higher resistor is adequate for these examples, subject to operating-temperature derating.

Verify Electrical Life Ratings and Required IP Protection Under IEC 60529

When comparing illuminated tact switches, check the electrical life rating under the conditions you will actually use. A figure measured with a small resistive load may not predict performance in a circuit with a higher current or a different load type. Read the test voltage, current, and operating rate, not just the headline cycle count. The LED’s rated life is separate from the switch contacts’ electrical life. They can age at different speeds. That matters.

Then assess the required IP protection using IEC 60529. The first digit describes protection against solid objects; the second relates to water exposure. A dusty control panel may need a different rating from a device exposed to splashes or cleaning spray. Check whether the rating applies to the complete assembly, including its panel seal and wiring, rather than only the switch body. Small gaps around a cutout can undermine an otherwise suitable component. Also, one water test does not automatically cover every kind of exposure, so match the stated rating to the real environment.

Ask suppliers for test conditions and installation guidance, and compare them with your own operating profile. If the datasheet is vague, pause before treating a high cycle count or IP code as a guarantee. That part is easy to overlook. I would also leave margin for temperature, repeated force, and imperfect mounting; real panels are rarely as tidy as drawings.

Copyright 2025 Fluidra S.A. | Created by BCM Marketing Agencia Privacy Policy Legal note | Cookie policy |

Technical cookies are strictly necessary for our website to work and you can navigate through it. These types of cookies are those that, for example, allow us to identify you, give you access to certain restricted parts of the page if necessary, or remember different options or services already selected by you, such as your privacy preferences. Therefore, they are activated by default, your authorization not being necessary in this regard. Through the configuration of your browser, you can block or alert the presence of this type of cookies, although such blocking will affect the proper functioning of the different functionalities of our website.


The analysis cookies allow us to study the navigation of the users of our website in general (for example, which sections of the page are the most visited, which services are used most and if they work correctly, etc.). From the statistical information on navigation on our website, we can improve both the operation of the page itself and the different services it offers. Therefore, these cookies do not have an advertising purpose, but only serve to make our website work better, adapting to our users in general. By activating them you will contribute to this continuous improvement. You can enable or disable these cookies by checking the corresponding box, being disabled by default.


Functionality cookies allow us to remember your preferences, to personalize certain characteristics and general options of our website, every time you access it (for example, the language in which the information is presented to you, the sections marked as favorites, your browser type, etc.) Therefore, this type of cookies does not have an advertising purpose, but by activating them you will improve the functionality of the website (for example, adapting to your type of browser) and the customization of it based on your preferences (for example, by presenting the information in the language that you have chosen in previous occasions), which will contribute to the ease, usability and comfort of our page during your navigation. You can enable or disable these cookies by checking the corresponding box, being disabled by default.


Advertising cookies allow us to manage the advertising spaces included in our website based on criteria such as the content shown or the frequency in which the ads are displayed. For example, if you have been shown the same ad several times on our website, and you have not shown a personal interest by clicking on it, it will not appear again. In summary, by activating this type of cookies, the advertising shown on our website will be more useful and diverse, and less repetitive. You can enable or disable these cookies by checking the corresponding box, being disabled by default.


Behavioral advertising cookies allow us to obtain information based on the observation of your browsing habits and behaviors on the web, in order to show you advertising content that best suits your personal tastes and interests. To understand it in a very simple way, we will give you a fictitious example: if your last searches on the web were related to suspense literature, we would show you advertising about suspense books. Therefore, activating this type of cookies, the advertising that we show you on our website will not be generic, but will be oriented to your searches, tastes and interests, therefore adjusting exclusively to you. You can enable or disable these cookies by checking the corresponding box, being disabled by default.
To understand it in a very simple way, we will give you a fictitious example: if your last searches on the web were related to suspense literature, we would show you advertising about suspense books. Therefore, activating this type of cookies, the advertising that we show you on our website will not be generic, but will be oriented to your searches, tastes and interests, therefore adjusting exclusively to you. You can enable or disable these cookies by checking the corresponding box, being disabled by default.

SAVE

We use our own and third-party cookies to ensure the proper functioning of the website and to analyse our services, improve your experience on our website and show you advertisements related to your interests according to profiling based on your browsing habits (e.g. websites visited). You can accept all cookies by clicking "ACCEPT" or set or reject them by clicking here. If you would like to know more about the use of cookies, please see our COOKIE POLICY.


ACCEPT ALL
Reject no essentials